Make-Ahead Chinese Potstickers
- Christine Simons
- Sep 2, 2024
- 7 min read

Updated: Jan 24, 2025
When my grandfather immigrated to the United States from Taiwan, he tried to leave his heritage behind. My American grandmother, on the other hand, strove to become the ideal Chinese wife. As a part of her efforts, she learned how to cook authentic Chinese meals.
Though my grandfather passed away many years ago, my grandmother continued making Chinese food and teaching her children and grandchildren to do the same. Her specialty—and a family favorite—is the potsticker dumpling.

Here's the thing, though: Chinese cooking is a laborious, often all-day affair. As a busy suburbanite, I rarely have the time or energy to make these delicious treats. So, today I’m going to share with you my secret to making potstickers ahead of time and enjoying them for weeks to come.
First things first: the hard work—you need to actually make the dumplings. Since we’re operating on a budget, I’m going to teach you how to save money by making them from scratch.
Before you get started, you might want to set aside all the tools and equipment you’ll need for this recipe. Make sure you have two large mixing bowls—one for the dough and one for the filling—as well as a rolling pin for rolling out the dough. If you plan to cook the dumplings immediately, you might want to use an electric skillet, as those can accommodate massive amounts of potstickers. However, if you’re cooking a small batch and freezing the rest, a standard stovetop skillet works just fine.

Now, are you ready to get to the recipe?
The first component you’ll need is the dough for the dumpling skins. Though some people buy wonton skins, my family has always made our own. It’s simple and cheap, though it requires a bit of elbow grease.
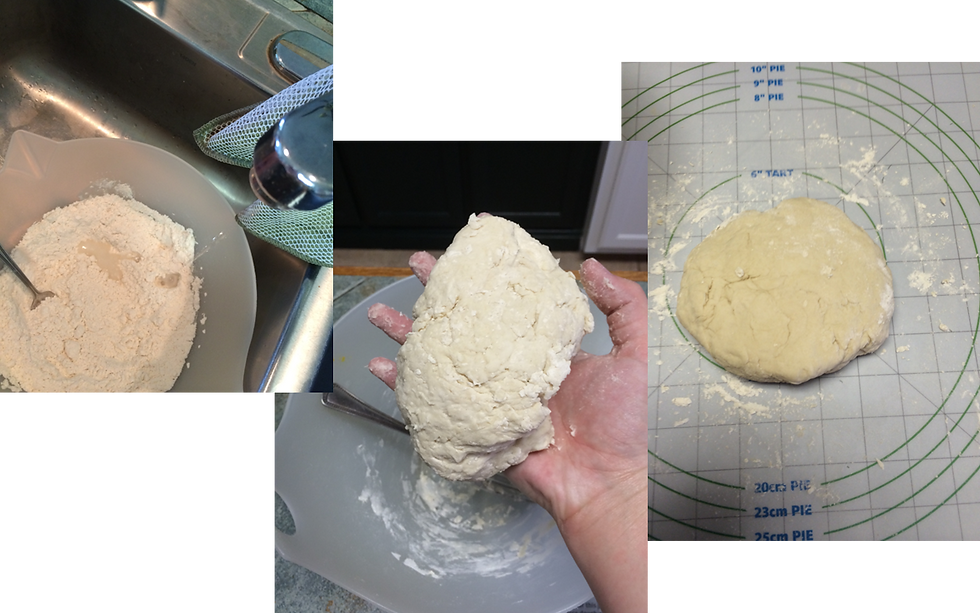
To make the skins, add a couple cups of flour to the first mixing bowl. Add some water a little bit at a time, mixing as you add. At first, you’ll see ribbons of dough where the water moistens the flour. Keep adding water and mixing until a shaggy dough forms (it’ll seem like it happens suddenly!). Once the dough forms a ball, turn it onto a floured work surface and knead for ten minutes, adding more flour if the dough sticks to your hand. By the time you’re done, the dough should be smooth, if a bit dry. Cover and allow to rest for thirty minutes.
While the dough rests, mix the filling. The type of filling used varies by region and ingredient availability, but it’s usually a simple mix of the following: meat, vegetables, and seasoning.
Simple, right?

Start by adding your meat to the second mixing bowl. Traditionally, my family uses half a pound of ground pork. Personally, I prefer a mixture of ground beef and turkey. Choose what works for you and your family’s budget.
Next, trim the ends off your vegetables (which you can turn into soup!) and finely chop them. When chopping the green onions, I find it’s best to separate the leaves from the stalks, then cut both lengthwise before dicing them into fine pieces. When chopping the napa cabbage, I cut out the triangular stalks from the center of the leaves and dice them separately; this is because the texture and consistency of the stalks and leaves are vastly different, so chopping them separately allows you to get finer pieces.

After adding your vegetables to the second mixing bowl, add your seasonings. For half a pound of meat, 1-2 tablespoons of soy sauce should provide adequate flavoring. To balance the saltiness of the soy sauce, you’ll also add a couple teaspoons of sugar. While it might seem odd to add sugar to a savory dish, it really does bring balance and harmony to the flavors. You’ll also want to add a dash of black pepper. Once you’ve added the filling ingredients to the bowl, mix well and set aside.
Confession: I do add a few ingredients that my grandmother does not include, namely minced garlic and finely grated ginger (I grate the ginger and then freeze it in candy molds, allowing me easy access to it when I need it). Though these aren’t necessary ingredients, I find that the added flavors send the potstickers through the roof (so yummy!).
Okay, now that our ingredients are mixed, it’s time to get to the real work.
By the time you’ve finished chopping veggies and mixing the filling, the dough should be ready. Traditionally, the Chinese roll the dough into a log, cut off a small piece at a time, and roll out each dumpling wrapper individually. My family, however, does things a little differently.
Divide the dough into three or four equal portions. Flour your work surface again, take one of those dough pieces, and roll it out as thinly as possible. Once it’s as thin as you’d like, cut out round circles for each skin. You can use anything to do this, from a large cookie cutter to a wide-mouthed cup to (in my family’s case) a washed-out metal can. Repeat until all the dough has been used.

Now that you’ve got your dumpling skins ready, it’s time to actually assemble the dumplings. Add about a tablespoon of filling to the center of each skin, being careful not to drop any filling onto the edge (this will prevent the dumpling from sealing properly). Assemble each dumpling by dipping your finger into a bowl of water and tracing the edge of the skin. Fold the edges of the skin over the filling to form a half-moon shape, then press the outer edges toward the center to form a decorative crimp. Press down on the moistened dough to form a tight seal which will lock the flavorful juices inside the dumpling.

Whew! That was a lot of work! It’s no wonder that I rarely have the time or energy to make these delicious flavor bombs.
Now, here’s the part where we set (at least some of) them aside for later.
These little beauties freeze wonderfully, even raw. So, once you’re ready to assemble your potstickers, all you have to do is line a baking sheet with parchment paper and plop each dumpling onto the tray as you assemble them. Make sure they’re not squeezed so close together that they’ll freeze into a solid block, but they don’t have to be spaced as far apart as they would be if you were cooking them immediately. Once your baking tray is full, place it in the freezer and allow the dumplings to freeze solid (I usually leave them overnight). Then, remove them from the tray and store them in a freezer-safe plastic bag. When you’re ready to cook them, you’ll follow all the same steps as if they weren’t frozen; it may just take a few extra minutes to account for the temperature difference.*
Easy, right?
So, let’s say you’ve frozen your potstickers and are ready to cook them now. Or, maybe you don’t want to freeze all of them and want to enjoy some immediately. How do you do that?
To cook the dumplings, grease your cooking surface (whether it’s an electric skillet or a stovetop skillet) with an oil of your choice. My personal favorite is beef bacon grease (absolutely divine!). Add the potstickers to the skillet, then apply medium-low heat. Cover and allow them to sear for 5-10 minutes; if they begin to burn, lower the heat further. Then add a half cup of low-sodium chicken or vegetable broth to steam them for another 5-10 minutes. Once the broth has evaporated off, check the dumplings to make sure the bottoms are browned, the tops are wrinkly, and the meat inside has been cooked through.* Serve with soy sauce and enjoy!
* Word of warning: it is extremely important that you make sure the meat cooks completely, especially if you’re using ground pork. Consumption of raw meat—especially ground meat—can lead to serious illness or death.


So that’s it! That’s my secret to making delicious potstickers ahead of time. The frozen potstickers keep in the freezer for a couple of months (or longer, if you don’t mind a little freezer burn). So, on the rare occasions that I have the energy to make potstickers, I can frontload my work and reap the rewards for weeks or months to come.
Make-ahead Chinese potstickers
Recipe
Materials needed:
2 large mixing bowls
Sharp knives and cutting board
Rolling pin
Wide-mouthed cup or washed-out metal can
Electric skillet (if cooking immediately)
Sheet pan and parchment paper (if freezing for later)
Ingredients:
Dough:
2-3 cups flour, plus more for dusting
Water (amount varies)
Filling:
½ lb. ground meat of choice
4-6 green onion stalks
4-6 napa cabbage leaves
1-2 Tbsp soy or tamari sauce
1 Tbsp minced garlic
2 tsp sugar
1-2 tsp finely grated ginger
½ tsp black pepper
Assembly and cooking:
Small bowl of water (for sealing the dumplings)
Oil of choice (for cooking in the skillet)
½ cup low-sodium chicken or vegetable broth
Directions:
In the first mixing bowl, add 2 cups flour and slowly incorporate water until a shaggy dough forms. Turn onto a floured work surface and knead for 10 minutes, adding more flour as needed. Cover and allow to rest for 30 minutes.
In the second mixing bowl, add ½ lb. ground meat. Finely chop the green onions and napa cabbage and add them to the meat. Add 1-2 Tbsp soy or tamari sauce, 1 Tbsp minced garlic, 2 tsp sugar, 1-2 tsp finely grated ginger, ½ tsp black pepper. Mix well and set aside.
Divide the dough into 3-4 equal portions. On a floured work surface, roll out the dough, one piece at a time, as thinly as possible. Using a circular cutter (like a cup or a metal can), cut out dumpling skins from the dough.
Assemble the dumplings by placing a tablespoon of filling in the center of each skin, being careful not to drop any filling onto the edge (this will prevent the dumpling from sealing properly). Line the edges of the skin with water, then crimp and seal them.
If preparing ahead of time:
Line a sheet pan with parchment paper. Place each dumpling on the pan, being careful not to overcrowd it. The dumplings can be placed close together, but you don’t want them to freeze to each other.
Once the pan is full, transfer to the freezer until the dumplings are frozen solid.
Transfer to a freezer-safe plastic bag and store in the freezer until ready to cook.
If preparing immediately (or from frozen)
Grease the skillet with oil of your choice. Set the heat to medium-low.
Arrange the dumplings on the skillet so there is adequate space between them (they should be less crowded than they were on the sheet pan). Cover and sear the bottoms; lower the heat if they begin to burn.
After about 5-10 minutes, add half a cup of low-sodium chicken broth. Cover again and allow to steam for another 5-10 minutes.
Once the broth has evaporated, check the dumplings to make sure they are cooked through (if cooking from frozen, this will take longer than if preparing immediately). The bottoms should be browned, the tops wrinkly, and the meat inside fully cooked.
Serve with soy sauce.
Have you tried out this recipe? Do you have other meat-veggie-seasoning combinations you prefer in your dumplings? Let me know in the comments!


Comments